

Maintaining a healthy and vibrant aquarium can be a challenge, but with the AUTOAQUA Automatic Water Change (AWC) System, it becomes effortless. The AWC system’s star feature is its automation, which allows you to perform regular, small water changes without the hassle — ensuring that your tank remains stable and your aquatic life thrives.
Let’s dive into how to calculate the correct water change volume and set up the AWC for optimal performance.
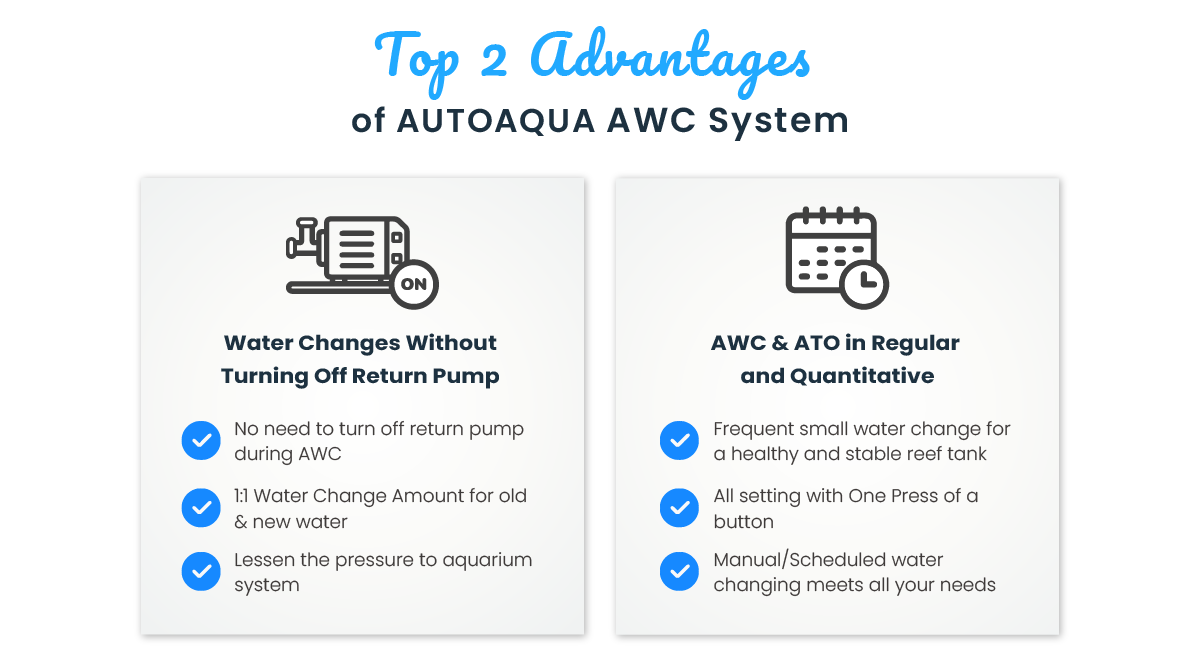
The AUTOAQUA AWC System offers two key advantages that make it stand out:
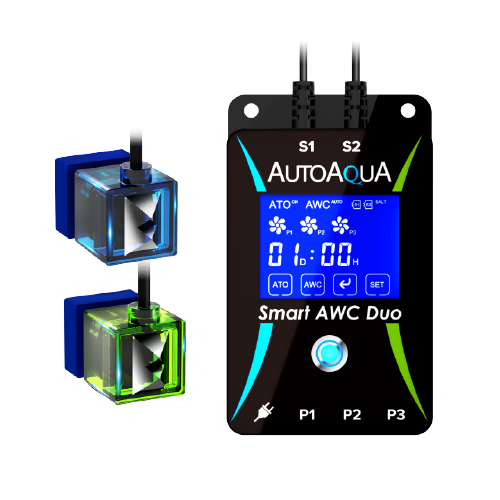
1. Dynamic Balance – Ensures Equal Water Exchange Without Turning Off the Return Pump Thanks to its exclusive dual optical sensors, the AWC system ensures equal water volume exchange without needing to turn off the return pump. This dynamic balance system reduces stress on your aquarium and simplifies maintenance.
2. Consistent Stability – Frequent Small Water Changes for a Healthier Ecosystem Frequent, smaller water changes help maintain a stable tank environment, promoting healthier fish and more vibrant coral growth. The AWC system allows you to automate small-volume water changes at regular intervals, ensuring consistent water quality without disturbing your tank's ecosystem. Just simply set it and forget it.
Setting up your AUTOAQUA AWC system correctly starts with understanding three key values: 1. Tank Volume – The total water capacity of your aquarium. 2. Water Change Volume – How much water you need to change each time. 3. Water Change Percentage – The percentage of total water you plan to change over a period of time. Take a look at the example below to see how it all comes together:
Ready to Calculate? Let’s Dive In! Feel free to adjust the values below based on your tank’s size and setup. Assuming your tank holds 600 L and you typically change 20% of the water each month, here's how you calculate the water change volume step-by-step:
1. Calculate the Volume of the Return Pump Area To calculate the water exchanged per cycle, measure the dimensions of the return pump area where the sensors are installed. For example, if the length is 20 cm, the width is 30 cm, and the height (distance between sensors) is 4 cm, use the formula: ● Length × Width × Height = Total Volume ● 20 cm × 30 cm × 4 cm = 2400 cm³ = 2400 ml = 2.4 L (per cycle)
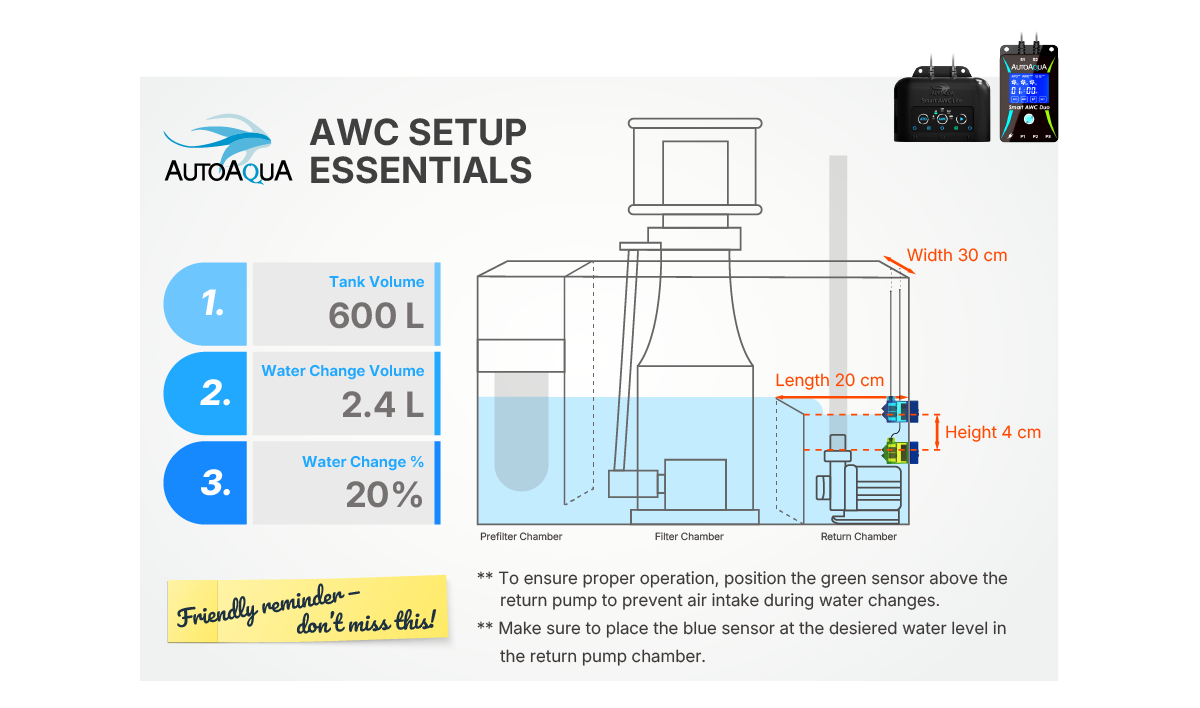
2. Calculate the Monthly Water Change Volume If you aim to change 20% of the water in a 600 L tank each month: 600 L × 20% = 120 L/month
3. Divide into Weekly Water Changes Since smaller, frequent changes create a more stable environment: 120 L ÷ 4 weeks = 30 L/week
4. Find the Number of Water Changes Per Week Since each AWC cycle changes 2.4 L: 30 L ÷ 2.4 L = 12.5 cycles/week ≈ 13 cycles/week
5. Set the Daily Frequency To distribute evenly across the week: 13 cycles ÷ 7 days ≈ 2 cycles/day
Your Perfect Water Change Plan! If your tank holds 600 L and you aim for a 20% monthly water change, set your AWC system to change 2.4 L of water twice a day for optimal stability and health.
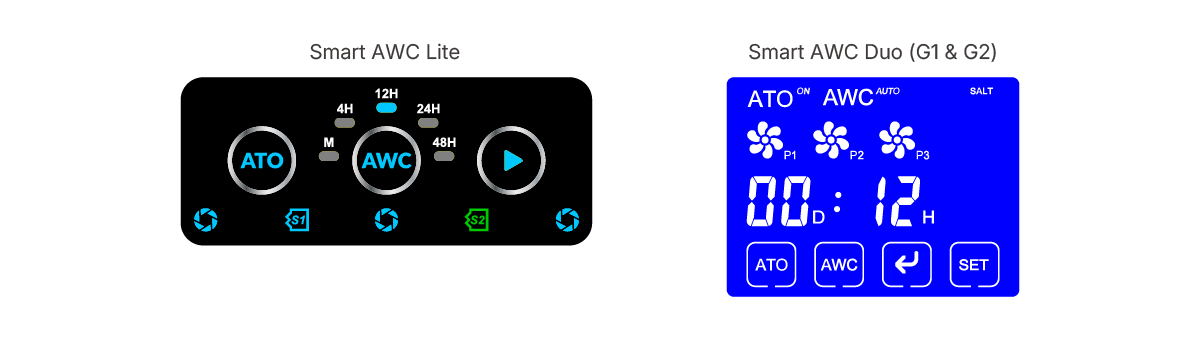
Setting up the AUTOAQUA Smart AWC System is straightforward. The system uses a countdown timer to control water change intervals and there is no need to turn off return pump.
1. Example Setup (Based on 2 Times Per Day) To set up water changes twice a day, use the following example: For both AWC Lite and AWC Duo G2, set the water change interval to every 12 hours (24 hours ÷ 2).
Enjoy Effortless Aquarium Maintenance
With the AUTOAQUA AWC System, maintaining a balanced and stable aquarium environment is easier than ever. Its dynamic balance system and automated scheduling ensure that your aquatic life thrives with minimal effort. Just calculate your tank’s volume, set up the ideal water change interval, and let the AWC take care of the rest!
Smart, simple, and stress-free — that’s the AUTOAQUA way!